To cover a house plant’s pot!

Warning – Lots of pictures!

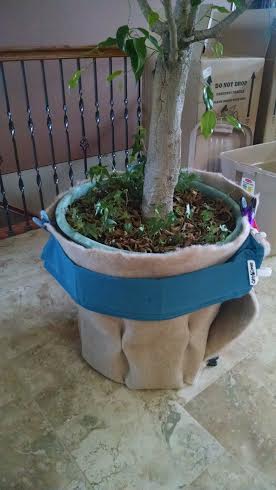
I have a tree in my house!   I’ve had this tree for over 20 years!  It is a ficus, which is tropical (at least compared to Minnesota!), so it can visit the great outdoors in the summer, but spends winters inside!  Over the years it has been re-potted into bigger and bigger pots and now weighs nearly 100 pounds.  When we moved last fall, we finally built a dolly just for my tree so it can roll around on the tile floor.  But the big, green, plastic pot is rather ugly.

potted tree

My tree’s pot – functional, but ugly.

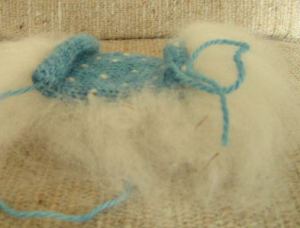
After years of being outside in the summer sun, the plastic is faded and scuffed.  It needed a dress!  So I put on my creative hat and went to work at my FeltLOOM.

Felt around pot

Felt wrapping the pot

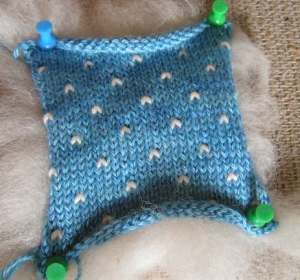
After measurements of the pot, I felted a rectangle made of 50% alpaca / 50% wool – the same fiber as I use for felted insoles.  The rectangle measured about 75″ long and 30″ high.  It is much thicker on the top than on the bottom, for reasons you will soon understand.

paper clips around bottom

Calculating the shape

Using big paper clamps, I estimated the shaping that would be needed around the bottom of the pot.  I marked these with a grease pencil on the back side of the felt.

blue accent fabric

Teal blue

red fabric

Or red fabric

I went to my fabric stash to find some bright teal fabric, but I didn’t have any bright teal.  I found a darker teal and a bright red.  This is just lightweight cotton/poly fabric.  After some Facebook voting, the red won.  I sewed two strips together to get a piece long enough to go the length of the felt.  I pressed under the long edges of the fabric.
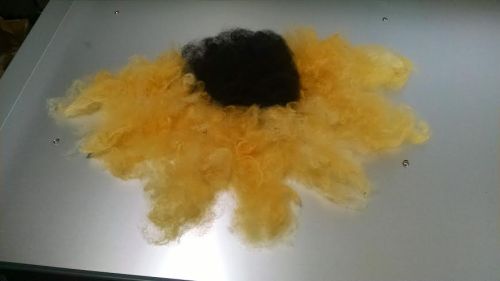
fiber sunflower

Sunflower of fiber

I found some black alpaca fiber from one of my alpacas and some dyed yellow alpaca fiber and loosely felted this partial sunflower.

sunflower divided for darts

Sunflower divided

I cut the sunflower so it would not cover where the darts would be that I marked for the shaping.

sunflower, fabric and yarn getting felted

Felting the piece

At the same time, I put the red fabric strip and two pieces of bulky alpaca yarn that matched the sunflower yellow on the felt piece and ran the entire thing through the FeltLOOM.
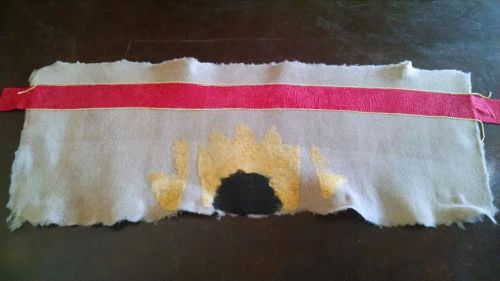
flat piece felted

Felting done

Everything is felted in place.

close up of a sewn dart

Close up of a dart

On my sewing machine, I made the darts that I marked out earlier.

Darts add the shaping

Darts all around

Six darts around the bottom, give it the shape needed to fit around the plastic pot.  These were really thick near the point of the darts, but my old sewing machine did the job with some protesting.  I was sure glad I had made the felt thinner near the bottom. I didn’t cut open the darts as they add stability on the bottom.

missed spots from the darts

Mismatch on the darts

The darts didn’t match up with felted sunflower exactly, so I hand needle-felted some additional fiber onto the bare spots to complete the sunflower.   At this point the darts would have been way too thick for the FeltLOOM to handle.

felted front with sunflower

Sunflower on front

Bare spots are filled in.

added grommets on the back edges

Grommets added

I sewed under the ends of the fabric and yarn, then added a row of big grommets near the edges.

yarn ties the grommets together

Yarn closures

I used some of the yellow yarn to tie the edges together using the grommet holes.
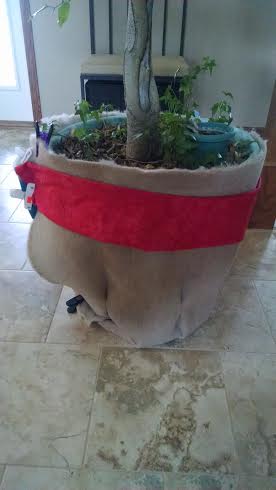
tree pot dressed up pretty

Ready for show!

And there it is.  My tree has a lovely new dress to wear during its winter time indoors.  And it is easy to take off when the tree goes out on the porch for the summer.

This was a fun project that added a nice pop of color in the kitchen/entry way.

Special Mittens

Late last year I was asked to make a special pair of mittens.  A mom had just purchased a headband for her daughter who has cerebral palsy.  The young lady’s hands are clenched into fists due to the disease.  This makes the thumbs on mittens stick out oddly and makes gloves out of the question.  So we chatted for a short time and came up with a way to make mittens that would fit these special hands.

Once my old wash machine was installed just for the purpose of felting, I was ready to give our idea a try.

felting in action

Felting in action

Using my sock yarn of 95% alpaca / 5% nylon and following my usual mitten pattern, I knit an extra long cuff.  I skipped the shaping for a thumb, and knit fewer rows for the hand.  Overall, the length of the mitten is about the same as my regular mittens.  After sewing the seam, I gave the mittens a big swish in the wash machine to felt them slightly.  Once dry, they’ll be ready for delivery!

completed mittens

Mittens complete

The felting will make them warmer.  I think there is still enough of this winter left that these mittens will get plenty use.  I sure hope so.

I enjoyed the challenge of adapting a familiar pattern for a special purpose.


Felting soap

Happy new year!  I’m looking forward to many new things in 2016:  new ideas, new location, and new projects.

That said, felted soap is a tried and true best seller.  I get soap that is hand made locally and felt it with alpaca fiber.

KONICA MINOLTA DIGITAL CAMERA

Carded alpaca fiber

I use mostly white fiber that I have carded, but also blend some dyed fiber with the white for a little bit of color on the soap bars.

KONICA MINOLTA DIGITAL CAMERA

Ready to felt

I tear the carded fiber into fluffy strips that will be wrapped around the soap – five strips per bar in alternating directions with the colored fiber going on last.  With hot water in a bowl and cold in the other, I wet the fiber with hot water and gently rub it until it begins to felt. As it felts, I dip it in the cold water to shock it into felting quicker.

KONICA MINOLTA DIGITAL CAMERA

Drying

The soap bars are set on racks to dry overnight.  Once completely dry, they are labeled and ready to go.   Who wants some lovely scented felted soap?

Felting on silk

I’ve been having a lot of fun being creative with alpaca fiber and silk.  I start out with silk scarves.  I’ve tried both black silk and white silk.

silk scarves

Silk scarves

I use some really soft alpaca fiber that I dyed.   Most of the fiber I dye has some variation of the color.

dyed alpaca fiber

Dyed alpaca fiber

I tease out the locks by hand until the fiber is puffed up into a big pile.

fiber ready for felting

Fiber ready to be felted and before teasing

The silk scarves are too thin to go through the FeltLOOM alone, so the scarf is laid on a piece of polar fleece fabric.  The alpaca fiber is arranged on top of the scarf.   This is a black silk scarf with bright chartreuse fiber on a piece of blue/black fabric.

Fiber on scarf

Fiber on scarf

All the layers are very gently and slowly put through the FeltLOOM, which needle felts the alpaca fiber into the silk.  This process does cause the silk to shrink some and get a little puckered on the edges.  After the entire scarf has been needle felted, the scarf with the alpaca fiber is carefully lifted off the polar fleece fabric.   The scarf is then laid on the fleece again and run through the FeltLOOM again.   Alpaca fiber can be added at this point to any bare spots where the fiber shifted.  I usually repeat this a few more times.

felting is repeated

Felting is repeated

Once the alpaca fiber is somewhat secure on the silk scarf, I put the scarf through the FeltLOOM a couple more times without the polar fleece fabric.  This tightens up the felted fiber.

the scarf is felted without the fabric

The scarf goes alone

The process is slow and delicate, but so worth it.  The finished scarf is then pressed and ready.

As you may know, we are selling our farm and home this fall.  Please share the link if you know anyone interested.   We will be having on last Farm Tour here, Sept 26 – 27, Saturday – Sunday, 10 AM – 5 PM each day.   We hope you will come out and see our alpacas, do some shopping and bring the kids for some fun fiber projects.

Gone to the Dogs!

It’s been a long time, but I’m going to jump back here like nothing has changed. Lots has changed, and that will come out in due time.

So what does one do with lots of left over felted pieces?

Felt scraps

Felt scraps

Most of these pieces are smaller than my hand.  They are left over from cutting out insoles that are made on my new FeltLOOM.

Small scraps

Small scraps

Someone suggested a dog pillow.  So yesterday I decided to whip up a fabric pillow case and fill it with the felted scraps.

Filled pillow

Filled pillow

This is just a light weight cotton/polyester fabric.  Good and strong.  But it needed a comfy covering.

Polar fleece outer case

Polar fleece outer cover

I found some polar fleece made in a tube that was the right size, as luck would have it.  All I had to do was cut it to the right length.  I sewed one end shut and hemmed the other end.

Finished dog pillow

Finished dog pillow

I added some velcro and just like that, I have a finished dog pillow with a removable, washable cover.  It measures about 20 inches square.  These will be limited to the amount of felted scraps I create from cutting insoles!  I’ll have 2 for sale at the Farmers Market this week in Elk River!

Thanks for reading.  I would love to hear from you if you are still checking in on my little blog.  Please try to comment below and let me know if there are problems – I’ve changed my blogging format as well as my website!

2014 is a wrap!

2014 is nearly over and I’ve come to a decision to take a break from my blog.  For most of 2014, my blog posts were few and far between.  Part of that is due to increasing my newsletter editions. Rather than 4 times a year, I’ve been publishing my newsletter each month.  In my newsletter, I try to highlight the new projects I’m working on and the events where I can be found.

So I would like to invite my blog readers to subscribe to my newsletter.  You can do that here.  If you would like to read past newsletters, you can find them here on my website – for newsletter archives, scroll down past the videos (watch them if you haven’t, they are pretty neat).

We are looking at some new and exciting ideas for 2015.  Please follow us on Facebook and subscribe to our newsletter.  Thanks for reading all these years.

Spotsie’s contribution

A few years back I used up some of my not-so-soft alpaca yarn knitting wrist warmers which I then felted.  I called them my ‘manly man’ wrist warmers because they were far from delicate or feminine.  Their place was with the ice fishermen and hunters.  But I noticed the ladies were trying them on and buying them for themselves, so I made more in smaller sizes until I had used up all my old ‘strong’ yarn.  After they were gone, I still had people asking about them – wanting the felted wrist warmers, not the pretty soft ones I had for sale.

And so after shearing this year, I had 2 fleeces from Spotsie (this year’s and last year’s).  Now Spotsie will be 10 years old this fall and her fiber is pretty coarse, but I had it spun into worsted weight.

white yarn

Spotsie’s yarn

On my last big dyeing day, I dyed some of the yarn and dyed the remainder in a pot earlier this week.

pile of green yarn

Dyed green

Some is green, some light purple, some a light brown/gray.  2000 yards in all.

2 balls of yarn

Wound into balls

Then it is wound into balls.

6 knit wrist warmers

Knitting is done

The wrist warmers knit up quickly on the knitting machine.

2 pair of seamed wrist warmers

Seaming done

Seams are sewn, leaving the thumb hole.

5 pair felted

Felting done

After agitation in the hot suds of the wash machine and a few hours hanging outside to dry, I have 5 pair of light purple felted wrist warmers.

size comparison

Before and after felting

The size is reduced considerably in the felting process.  I should have 5 pair of the gray/brown and 6 pair of the green, for a total of 16 pair.  They will soon be available at craft show or farmer’s market!

Thank you, Spotsie, for providing just the fiber I needed for this project.

Amazing Shawl

I while back while at Anoka Fiber Works I met a gal who had purchased some white roving my shop space there.  She had spun the roving on a supported spindle and it was lovely.  I think the fiber was from my alpaca Carley.  The goal was to knit a shawl from the yarn.

shawl

Before blocking

And before I knew it, this spinner/knitter had finished a lovely shawl and sent me pictures of it.

shawl being blocked

Being blocked

Beautiful.

shawl after blocking

After blocking

Lovely.

close up of lace

Close up

Lace detail.

shawl being worn

Being worn

And looks great on!  An especially amazing project to complete by spinning on a spindle and knitting!  So proud to have contributed just a little!

Knitting Machine Camp 2014

Last week I went back to Rocking Horse Farm for 3 days of Knitting Machine Camp.  I’ve been doing this for years (last year, 2012, 2011, 2010, 2009, 2008) and every year I learn new things and come home with a head full of ideas for projects.

Here are the highlights from this year.  Day One:

lace scarf

Lace scarf

I learned why I was not able to make a lacy scarf — I was not using the correct kind of stitch pattern.  I also learned how to draw patterns on the pattern sheets that my knitting machine can read.  I’m looking forward to knitting some scarves with my dyed alpaca lace weight yarn.

tree ornament

Two for one!

If you read the post from last year’s knitting camp, you saw that I knit a little Christmas tree ornament sweater with hopes of using it for a gift card holder.  You also read why that didn’t work out so well!  This year I think I hit on a workable design!  This started out as a pattern for a pocket doll.  I revamped it to hold a gift card.  And it only took a few hours to knit!  Since this prototype, I have thought of a couple ways to speed the process.  I’m really excited to start knitting these!

Day Two:

cape on doll

Short-row cape

I made several little capes – all doll sized.  I learned the technique of short row knitting and how to add or subtract from the amount of flare in the cape.  This will make great capes, bed jackets or wraps for folks in wheelchairs.

poncho on doll

Poncho

Sticking with the doll theme, I knit this poncho using a mock rib stitch – very simple by leaving every third needle out of work.  Then I learned a fun seaming method which shows off, rather than hides, a seam.

Day Three:

Thrummed knitting

Thrumming – right side

Above is little sample showing the outside of thrummed knitting.  This is a technique used to make super warm mittens or socks.  Short pieces of roving are knit into stitches at intervals across the rows.  This leaves a little / on the outside.

thrummed alpaca

Side view of thrumming

On the inside of the mitten, your hand is surrounded by soft alpaca fiber.  This will keep hands super warm and will eventually pack down and felt slightly – more so in socks than mittens.  While time consuming to do, the result is mittens that unparalleled in their warmth.  I hope to create a sample to use to take orders for these.

All three days were filled with good food, conversations with new and old friends and lots of tips and tricks to use in future knitting projects.  It is a treat to have three days to concentrate on knitting.  Now to put all those ideas into real projects!  Where should I start?

Drawing a blank?

I’ve knit a few sock blanks from my new sock yarn.  Do you know what sock blanks are?  Have you tried them?  Do you like them?

Sock blanks are a rectangular piece of knitting using 2 strands of white (or very light) sock yarn.  This rectangle is then hand dyed or painted in any way – the more intricate the better.  After drying, the rectangle is unraveled with each strand being wound into its own ball.  The result is 2 balls of identical yarn to knit into 2 matching socks. Perfectly matched socks every time!  No muss, no fuss!

sock blank

Sock blank

Here’s why I think my sock blanks are really great!

  • They are made from my 95% alpaca / 5% nylon sock yarn
  • There is 300 yards of yarn, 150 yd per sock
  • They are knit in the rib stitch, not stockinette, so they lay flat for dyeing
  • The rib stitch is loose, so dye will soak through and dye evenly
  • The rib stitch is loose, so unraveling will be easy
  • They have ample ‘scrap’ yarn on the end to start unraveling so you can easily find the ends
  • And… ( I think this is very cool)
loop at beginning

Bonus!

At the beginning, which will be the last to be unraveled, is a loop.  If you are making socks, just snip your 2 balls of yarn apart.  But if you would like to make a very uniquely dyed scarf, you can knit one ball from the center, the other from the outside of the ball and your scarf will be mirrored from end to end.  THAT is one of a kind!

Are you ready to try sock blanks?  I would love to see your results!