Tag Archives: roving

Dyeing roving again

Last fall, I wrote about my first attempts to dye alpaca roving.   Ever since, I’ve been wanting to dye more roving.  And I finally got to it.

undyed roving

Chained roving

I weighed out one ounce of alpaca roving and starting with the ends held together, I chained the roving.  Each of the above chains are about four feet long.  Then following the methods I had used last fall, I dyed each chain.

roving in pan

Ready for the roaster

And here they are:

3 chains of dyed roving

Dyed roving

From light turquoise to dark, another from pale pink to lavender, the last from bright sunshine to florescent green!

roving again

Another view

These are now for sale at Anoka Fiber Works, $5/ per one ounce chain. Ready to spin or blend on a blending board.

I think I’ll try dyeing some fawn roving next.

But does it spin?

The proof is in the pudding, as they say, so dyeing roving is only successful if yarn can be spun from said roving! 

And so I took the roving I dyed in my first and second dyeing sessions and set about spinning it.  I was able to gently pull the roving to unchain the finger chains I  made before dyeing. 

Single ply on the bobbin

Single ply on the bobbin

And it spun up into a colorful single.  I just spun one chain after the other until all were done.  On the right end of the bobbin is the chain that had the mixed dyed on the underside, resulting in brown dyed roving.  But once spun, it just appears as a darker version of the colors.  I think I prefer it to the lighter colored yarn.

single ply ball

Singles in a ball

I then wound the single ply into a ball to ply it from the center pull ball.

2-ply yarn

2-ply yarn

If I were a better spinner and had spun a much finer single, it would have been fun to see this navaho-plied.  But even as a traditional 2-ply yarn, I rather like it.

skein of yarn

Skein of yarn

The resulting yarn is very squishy and so far I’ve just been petting it and holding it.  I think I will keep it to show the dyeing results.

I gave a chain to Mary of Spinning Magic so she could spin it on a spindle.

single ply

Singles

Here is her single ply yarn on her Turkish Spindle.

2-ply yarn

Plyed

And Mary’s after plying.

yarn

Finished yarn

This is the finished yarn spun on a spindle.  I have not seen this yarn in person yet, but it looks to have spun up with ease too. 

I’m so happy with my dyeing attempts and the resulting yarn.  I’m looking forward to spending some quality time with my roaster and dyeing more roving!

Dyeing Roving — part 2

In my post on my first attempt at dyeing alpaca roving, I mentioned a tip from a friend.  Here it is:
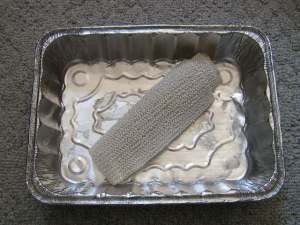
shelf liner

Secret weapon

What is that in my pan?  It is that rubbery kind of shelf liner.  Here’s how I used it. 

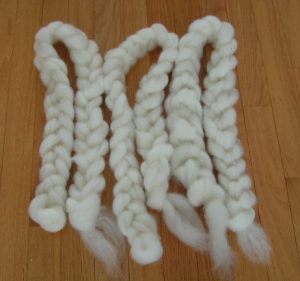
Again, I made finger chains of the roving.

chained roving

Chained roving

I put them on the shelf liner, rolled it up jelly-roll style and soaked it in the citric acid water.  By having the mushy roving stablized by the shelf liner, I was able to squeeze out more of the excess water and squirt on more dye. 
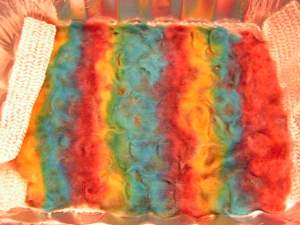
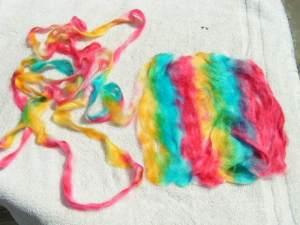
chains with dye

Chains with dye

The chains are laying hortizontal in the photo, so the dye is striped across.   I used my roaster for heating the fiber and I was much less worried about scorching the roving than when I used the oven.  Plus, my roaster is dedicated to dyeing.  Oven is out, roaster is in!
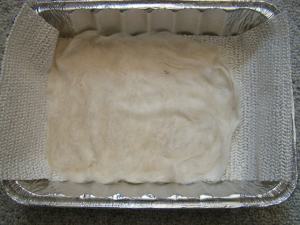
top of chains

Topside

After being heated and allowed to cool, I rolled the fiber and shelf liner back into the jelly roll and rinsed the fiber.  Again, the shelf liner really helped hold the fiber together.

bottom of chain

Bottom side

The colors pooled together some on the bottom and created some brown dye.  At first I thought this was a bad thing, but it gives a whole different color dimension to the yarn.  I think it is a good thing when I can see the future!
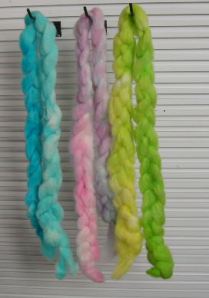
dyed chains

Chains

The three chains separated easily for drying.

Then I tried another idea. 

coiled roving

coiled roving

 I took a bunch of the coiled roving and rolled it up in the shelf line without chaining it.

coiled roving

Coiled roving

I wanted to see if it would be stable with just the shelf liner and not the effect of chaining. 

dyed on roving

Dye on

Again, I striped on the dye and cooked it in my roaster.  (clothes pins on the pan held the shelf line in place and made it easy to pick up the pan)

bottom of coil

Bottom of coil

The coil was thicker than the chains and the dye didn’t quite make it to the bottom.  I’ve been very cautious about poking the roving too much or trying to turn it over to see the bottom. 

Unwrapping the dyed coil

Unwrapping the dyed coil

The coiled roving after rinsing was still easy to unwrap.  My dilemna with dyeing the coiled roving is that I would either have to stuff the roving in a bag for sale or roll it into a ball.  I’m not sure if either of those choices is as good as having the roving already chained into a braid that is easy to show off. 

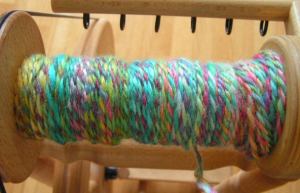
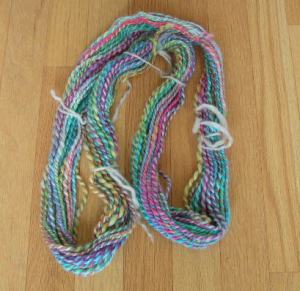
I feel the dyeing of the roving is pretty successful.  It doesn’t seem to have felted.  But the true test will come in the spinning!  I will share that with you another day.

Have you tried dyeing roving?  What are your secrets for success?

Cleaning fiber

Today was the final step in a process that started over a month ago.  In May, we got this from Kinney Valley Alpacas.

bags of alpaca fiber

Many bags

Each bag is the blanket fleece from one alpaca.   They sat in our barn for a few weeks before I started cleaning the fiber. 

alpaca fleece blanket

A blanket

First it gets spread out on my skirting table.   This is one half spread in front and the other side still rolled up in back.

alpaca fiber

Yummy fiber

When washed it will all be as shiny white as in the center.  Isn’t this pretty, though?  Soft and crimpy.

course fiber

Perhaps from the legs

But then my job starts.  Above is probably some leg fiber that got mixed into the blanket by mistake.  Can you see how much courser it is than the fiber under my hand?  It goes on the floor.

second cuts

Second cuts

While these little pieces are soft, they are short, sometimes only a fraction of an inch.  These are caused by a second pass made with the shears.  They make a mess in yarn.   Onto t

junk in fiber

Misc 'stuff'

These are some smart alpacas as I found several scraps of paper from the newspapers that they must have read!  And there is hay, weed seeds, mud clumps and the occasional ‘alpaca bean’.

dirty fiber

Too much VM

Sometimes there is just too much vegetable matter to save a chunk of fiber.   Especially crias first shearing have a tendency to hold onto lots of stuff in their fiber.

fluffy fiber

All shook up

Lastly, I vigorously shake the fiber to loosen more dirt, dust and VM.  The result is a big fluffy mess of fiber. 

bags of clean fiber

Ready to go

The clean fiber is stuffed into a bag.  These three bags comprise over 25 pounds of fiber, which went to be spun into sport weight yarn today.

fiber on the floor

Fiber refuse

The very last step is to clean up the mess of dirty fiber left under my skirting table.  That is a job for the weekend! 

While I was at Rach-Al-Paca’s, I picked up my roving from Carley, Annie, and Georgie.  Anyone ready to spin?

Another for the ‘done’ column!

A while back I got this:

Bags of fiber

That is 19 fleeces from Kinney Valley Alpacas.  All have low micron counts (that measures the diameter of each fiber) which makes nearly all of them fall into the ‘baby alpaca’ category of fineness.   Only a few were just outside the range considered baby alpaca.  Slowly that became this:

Going down, down, down

And finally, this:

All gone from here

Meanwhile, on the other side of the shop in the barn, this was appearing:

Two full bags

And then became this:

Six bags of cleaned fiber

Another angle – yes, I’m very proud!

These bags are big

Each of those bags average over 6 pounds of cleaned, very soft fiber.   Five bags will be sport-weight yarn, one bag will be lace weight.  All to be dyed and for sale!   This was left behind:

Under the skirting table

Tomorrow I’m making a run toRach-Al-Paca fiber processing mill.  I will be bringing these six bags as well as some from our animals – Vagabond‘s, Jose‘s, and Pelasia‘s.  I’ll get some roving and some yarn from each of these.  It will be a while before I get this back, but I do have roving from Toro waiting to be picked up.  I’m also picking up a big yarn order for Twisted Suri Alpacas.  They have asked me to dye some of their white yarn.  Can you guess what is on my schedule for next week?

Speaking of next week – we’ll be at Pie Day in Braham on Friday – Aug 6.  Come see us and have a piece of pie!  YUM!

The latest felting kit

The last couple weeks, I’ve been working on creating a new felting kit.  I chose a cute little bunny in a flower pot from the designs selected by my partners at Twisted Suri Alpacas.  After dyeing and stamping and all that, I got to needle felt the design.  This is the fun part!  And I am ‘required’ to do every design so I have an example to take the pictures for the packaging.  😉

Bunny #1

I asked for opinions and 3 out of 3 (4 of 4 if I include my own opinion!) were not thrilled with the bunny’s color.  So…..

Bunny #1 removed

I had carded white and black fiber together for the gray and thought I had a really nice gray roving!  I’m considering attempting to combine a bunch more and even try spinning it.  Gray yarn is so popular, but gray alpacas are rare.  (It is a bonus when good still comes out of an experiment gone awry!)  But a gray bunny was not to be.  So I tried again.

Bunny #2

This is the finished picture!   Already in our Etsy shop.   Cute and fun to make.

A new way to dye

I’m starting a new alpaca felting kit  design and have started dyeing roving in the new colors needed for this design.  I decided to try acid dyeing in aluminum pans heated over water in my big roaster. 

After soaking the roving in soapy water for about a half hour, I put it in the tins over a couple inches of water in the roaster.   I added the citric acid directly to the dye, which I mixed up in a little glass jar and sucked up in a big syringe.  I squirted the dye onto the roving and squished it around with chopsticks.  I added a little more water as needed to get better coverage.   Then I cranked up the heat and let it cook!

Cooking over the roaster pan

Cooking over the roaster pan

I have an ounce each of 2 shades of what I was hoping to be a rusty red roving.  In the smaller pan I have 1 ounce of roving divided into 2 shades of green.

Since the roving is not directly in contact with the hot roaster pan, I could use higher heat.   The roving got more steamed than boiled. 

This is the result.

New colors of roving

New colors of roving

The purple was done in a dye pot on the stove.  The 2 reds are more red than the brick color I wanted and I didn’t get solid coverage of the color.   Neither of these really matter for the felting design.  That is why I chose this project for my experimentation.  The green also has some lighter areas that didn’t get much dye, but grass and leaves can be that way!   Now I know – I need a little more liquid to get the dye to reach all the roving in the tin pans.   The citric acid in the dye makes the dye stick to where it is squirted faster than when in a big pot of water.  Good lessons to learn.

I’ve a few more colors to dye before I can felt the new design, but I’m hoping to to get it done this week!

Reaching the finish line!

I’ve completely finished the remaining custom  order sets.  The blue and brown set:

Completed!

Completed!

And the brown set:

Also done!

Also done!

All boxed and ready to go.

It's in the box!

It's in the box!

All I have left to complete this order is one more hat.  It is on the needles.  Then I will move on….  I want to do some multi-color dyeing for a scarves.  I MUST work on getting a felted hat perfected!  And knit a hat from that yarn I spun at the retreat (there is lots if you would like some!)  And I got a bunch of yarn and roving back from Rach-Al-Paca…..yummy!  Want some???? DK and worsted yarn, dark brown from Chestina and Jose.  Way too many ideas and never enough time. 

It is snowing like mad here!  I’m refaining from showing pictures as snow pictures seem to be on every news channel and blog lately.  But it is lovely – from inside looking out!

Brand new!

Announcing:  (drum roll, please!)

Alpaca Felting Kits   (and the crowd go wild!)

I’ve been working with Roger and Gina of Twisted Suri Alpaca Ranch to develop a line of felting kits using our alpaca fiber.  I have finished our first design.  Scroll slowly and watch this little wonder develop before your eyes. 

What is it?

What is it?

A little more to see

A little more to see

Can you guess?

Can you guess?

Almost complete

Almost complete

Hello World

Hello World

Framed and ready to fly!

Framed and ready to fly!

This butterfly design will be our first felting kit.  The felting kit will include the backing (60% alpaca / 40% wool) which will be stamped with the design, hand-dyed (by me) 100% alpaca roving, alpaca yarn, a foam block to use for needle felting, 2 felting needles, complete instructions and a photo of the completed design.   Frame is not included.   We’ll also be creating refill kits which will contain everything in the felting kit except the foam and needles.  We have a hot-air balloon design, an alpaca and an iris in the works.  We have our Etsy shop  – Alpaca Felting Kits – open, but no kits posted yet.   We still need to do the accounting (blah!) to determine the price of the felting kits and refill kits.   As I get the roving dyed for each design, they’ll be available for sale. 

What do you think?   Do you like the butterfly?  Do you want to see more?